Now blogging at THIS SIMPLE HOME.

Now blogging at THIS SIMPLE HOME.

At This Simple Home

Showing posts with label mom craft. Show all posts

Wednesday, May 11, 2011

Another Wall Hanging

I love personalized items-note cards, pillows, key chains, wall hangings...and even if I have not made a personalized wall hanging for my son yet, I have made a few as gifts.  Above is the most recent one that I made for a newborn baby of a friend.  (Isn't Felicity a beautiful name?)  It is really basic with just paint for the background instead of scrapbook paper.  (I didn't want to clash with nursery decor.)  For the lettering, I used a brown behind a green print that had brown and pink in it, though you would need to click the photo to enlarge it to see all of that.

You might notice the shiny glare...the Mod Podge I used was glossy.  Next time I will use regular matte finish.  The photograph shows just how imperfect it is...if you have any tips for keeping lettering straight while using Mod Podge, please share!  I'm glad it was appreciated despite the flaws!

If interested in how to make a personalized wall hanging or changing it to a barrette holder, you can click the links.

Tuesday, February 1, 2011

Stitched Valentine's Card

[100_2306.JPG]Two years ago I made this card for my husband for Valentine's Day.  It still hangs on our refrigerator with a  Bible verse inside that remains an excellent way to show love.

Though this is perfectly appropriate for a grown up to make, it is equally appropriate for a child learning to sew.

The idea and template came from Make and Takes.  She has other cute stitched cards, too.  She also inspired me to make my own template for a Housewarming Stitched Card.

Last year I made an Owl Valentine's Day card for my husband.  Do you make your own cards?  I would love to see your ideas!  Please inspire me!

Curious about the verse I chose?  I can be quite selfish, so it's quite good for me.
Do nothing out of selfish ambition or vain conceit.  Rather, in humility value others above yourselves, not looking to your own interests but each of you to the interests of others. ~ Philippians 2:3-4

Monday, January 24, 2011

Make a Gift Bag

Earlier this month I went to a baby shower.  Part of the gift I purchased came from a little toy store that gives white paper bags with the purchase.  Instead of buying another gift bag and wasting this one, I just decorated this bag.  I dipped cookie cutters in paint and pressed to the bag.  Simple...though the picture certainly shows how crooked my prints are.

Wednesday, January 5, 2011

Name Bean Bags

You might remember my thoughts to make several handmade gifts for my family.  Well, it was just a thought...not reality.  I still like the idea of trying to make fabric letters for my kids, but I after cutting out one letter's layers, I thought it was just too much.

Since I still wanted to sew a toy that had letters, I made bean bags for my children.  Each bean bag has a letter of the child's name.

These are rustic.  I know.  But they have great potential for throwing and word building.
You can create words other than their names, too.
VEGAN-for my friend Jenny
Silly Eagle Books first gave me the idea for name bean bags.  But she used fabric paint...and I did not want to buy fabric paint or freezer paper.  I had the thought to just use a fabric marker, but really I tried, and it didn't look good.  So I used applique.  I learned how to do it when I made the name pillows.

I have always had a thing for lettering.  I cut these letters fully free-hand.  (When I was in high school I used to draw the names of my favorite bands on my book covers and notebooks to look like their names on my cassette tapes.  I was pretty good, too, at Poison and Cinderella.  Though my taste in music has changed, and I pay much more attention to lyrics than I did then, I still like to play with letters and words.)

If you are interested in cutting letters from fabric or paper free-hand, I totally recommend it!  To keep the letters all the same height, I first cut a long rectangle of fabric.  Then I cut that rectangle into smaller rectangles, always keeping the height the same.  It is not necessary to have all the rectangles the same width because some letters should naturally be wider than others.  (W takes up much more width than I.)  Then I just cut.  Of course you could draw the letters on the fabric, too, but this worked great for this project.

I appliqued the letters to the top of the fabric squares and then sewed them, leaving a small opening for the beans.   (A funnel is helpful!!)  We learned that Roman beans are much too large, dense, and heavy to be in a bean bag.  It would have been a weapon for my children!  We changed to a smaller black-eyed bean.  They turned out well enough for our family.

If you decide to make name bean bags, I'd love to see your result!  Paint sure would have been simpler, but these work, too.  I didn't have any masculine small-print fabric, so I used the navy stripes.  I really liked the feminine purple with multi for my daughter though.

Monday, December 13, 2010

Homemade Paper Christmas Ornament ~Tree~

I've always liked homemade paper.  It probably comes from my love of stationary.  So I was excited to learn how to make homemade paper ornaments-that even my little guy could make.

I came across this post that first told me about these paper ornaments.  A Faithful Journey let me know that by not reading my Family Fun magazine, I had missed out on this little craft.  I immediately went to my December issue and found this homemade paper ornament craft.
Photo from Family Fun
That very day my children and I went about making our own ornaments before naptime.  Even my two year old son made his own!  We decided to make tree ornaments.  I thought my newly acquired sequins would add a nice touch since we do not use glitter in our home.  Interested in your own?  These directions will make three 3 inch ornaments.

1. Preheat your oven to 200 degrees.  Take 3 pieces of construction paper and tear them into domino-sized pieces.
2.  Place the torn paper in a blender with 1 1/2 cups hot water.  Stir a bit to make sure all the paper is wet.  Let it sit for five minutes. 
 3.  Pulse in the blender for about 30 seconds.  Be sure the lid on the blender is on securely, otherwise the heat will make the lid come off a bit.  Then you will listen to your son say, "Mess!  Mess!" to you.
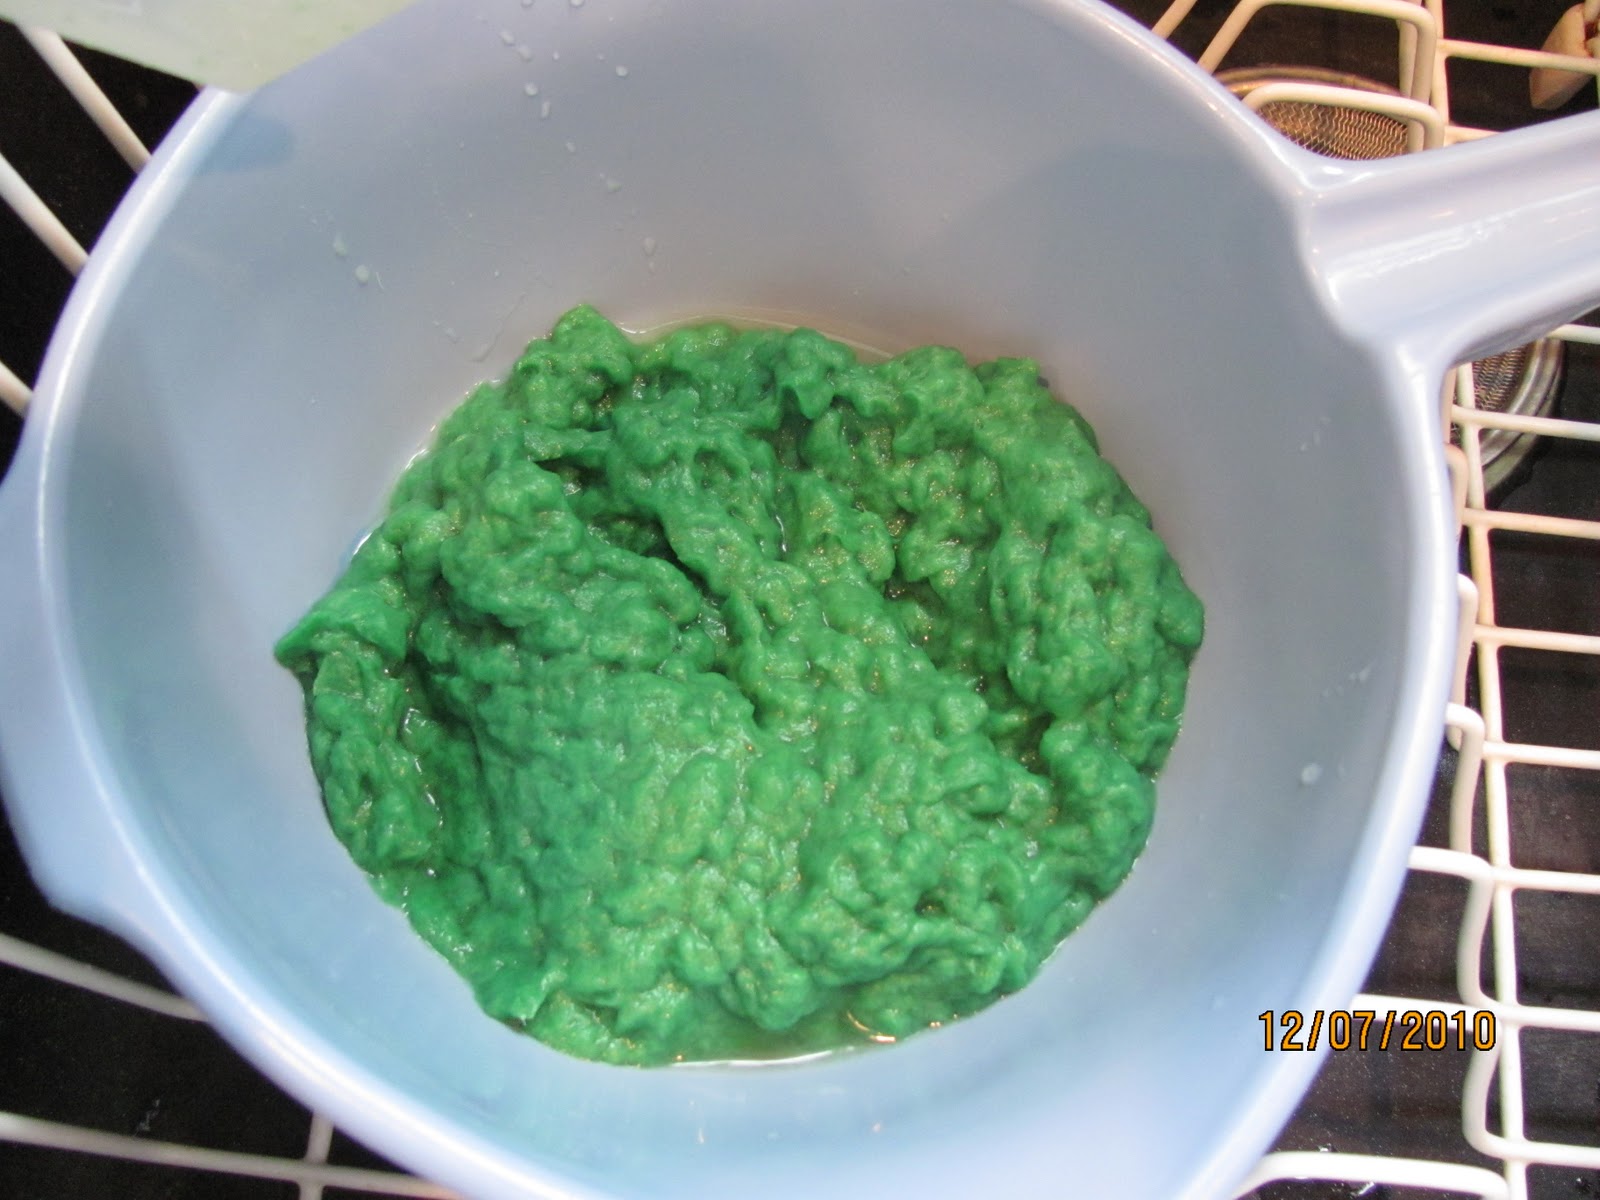
4.  Place the paper pulp in a strainer and squeeze out the extra water.  Place a rag on top and push down to remove additional water.  
I would suggest dividing the paper pulp into thirds so you know how much pulp to put in each ornament.
5. On top of a plate, put a dish towel.  On the dishtowel place a paper towel and then your 3 inch ornament. 
 6.  Spoon paper pulp in the ornament and press down.  This is where more detail would have been nice from Family Fun.  I'm not sure how thick these ornaments are supposed to be.  I'm guessing about 5 mm?  
Be sure to get the corners really well.  Then place a rag on top to get the extra water out.  If you are using glitter, sprinkle now.
 7.  Gently press the cookie out of the cookie cutter.  
8.  Bake at 200 degrees for two hours, according to Family Fun.  We used parchment paper on cookie sheets.  If you are me, you will need to bake them for about 4 hours to remove all the moisture, which is important.  I'm not sure if ours were way too thick...but 2 hours was not nearly enough.  (Once again, I would suggest dividing the pulp into thirds.  We did not do that.  I wish we had thought to do that!)
9.  Since the sequins that we put on did not stay on, I used Mod Podge as a glue covering, which worked effectively.  You could wait until now until now to put the sequins on with glue or Mod Podge.  Instead of trying to  
10.  Finish by gluing a thin ribbon or yarn to the back of the ornament.
My 2 year old's tree.
 Interestingly enough, we tried to make a second batch of ornaments.  I thought it would be fun to add flecks of other colors to the tree ornament.  So in addition to the original three green pieces of paper, I added scraps  of other colors.  Well, you know what happens when you mix all the colors, right?  You get brown!

So our plan changed and we made gingerbread men.  Of course, these go well with our gingerbread children craft and our gingerbread house.
How about a little reading to go along with these lovely homemade paper ornaments?  
The Legend of the Christmas Tree or The Gingerbread Friends might be enjoyed by your family like they are by us!

This is linked to ABC and 123, stART, and Kids' Craft!

Tuesday, November 30, 2010

Handmade Jesse Tree

Finally!  I did it!!  With a few hours to spare, my Jesse Tree is complete!  (Left-click on any image to view it larger, as always.)

This Jesse Tree has two-sided ornaments to tell the lineage of Jesus.


Isaiah 11:1 A shoot will come up from the stump of Jesse; 
   from his roots a Branch will bear fruit.


Please read more about how I made this homemade Jesse Tree with a printable and directions!

Tuesday, November 2, 2010

Little Jewelery Box

My daughter has quite the collection of dress-up jewelery.  It probably didn't help when my son broke a necklace and he replaced it with a four necklace, four bracelet, four ring set-all for $1!  I'd been wanting M to have an appropriate jewelery box instead of her little plastic sandwich baggie.

I found a decent sized wooden box at Jo Anne's.  It's about 6x6 inches.  To spice it up (and cover the cheap wood), I painted it white.  Mod Podged a 5x5 piece of scrapbook paper on top, and stippled the sides for color.  Obviously, the scrapbook paper didn't cooperate with all of those wrinkles.  I embellished the flower paper with three-dimensional butterfly stickers that coordinated a bit.
(Photos taken on M's comforter that is purple, green, and a bit of blue.)
This was given to M for her fourth birthday.

Tuesday, August 17, 2010

End of School and Coordinating Cards

My daughter just had her last day of preschool in her speech and language classroom.  This is a huge praise because it means that her speech has come so far.  She no longer needs such intensive services.  (You can read our big speech update here.) On September 1st she will begin school at a local regular school.  (Can I tell you how I fear that she will learn lots of bad things to say?)

M had a teacher, two aides, and an SLP at school.  I wanted to say thank you to each of them.  Should I tell you my plan for gifts so you can laugh at me?  My intention was to make them each a card, a wonder wallet, and a small gift card to go in each wallet.  I also wanted to make them my chocolate chip cookie pie to share.  (I chose to go with one pie to share since some people are hesitant to eat something from a child's home.  Not all, but some.)

The reality is that my husband was out of town last week, and my daughter was pretty sick (with an ear infection, strep throat, and cold).  We had two different doctor's appointments and a chest x-ray.  She missed three mornings of school, but thankfully did make it to school on her last day!  (Somehow my son stayed healthy.)


Based on my very limited time, I only made the teachers thank you cards and gave them gift cards.  So much for sewing and baking.  Speaking from my teaching career, the personal note is the most important part, anyway, and I made sure I completed that!

Recently I have figured out that card making takes a lot of time, but it's much more effective if I try to do more than one at a time or at least cut lots of things out at once.  I made four coordinating thank you cards.  The photo may not be great, but the cardstock background is cream with green and lavender details.  

Someday I am going to make cards in advance, but for now I just try to cut out extra shapes and even words from the Cricut.  I just love handmade cards, and try to make them for a lot of our card needs.

Tuesday, August 3, 2010

Christmas Craft Ideas

Last year my handmade Christmas items were incredibly limited...almost non-existent.  (But baby Jesus in the manger was cute!)  I want it to be different this year!  It's August.  My hands need to get busy if I am going to make some homemade gifts this year, don't you think?  I just found Twelve Crafts Till Christmas blog and was inspired to get moving!

Here are some craft ideas from my favorites list.  Some are easy crafts; some are cute.  My intention is NOT to complete them all, but maybe some?  I hope.  All would be awesome!

You may be wondering why I don't get started on a project right now.  Well, I am in the middle of making a patchwork purse for my sister.  AND my daughter's school year ends in less than two weeks, and I am hoping to make a couple things for her teacher, aide, and therapist.  We'll see how that really works in reality!

Below are the items saved in my "Favorites" for Christmas 2010.
Silly Eagle Books has several suggestions for making a nativity.


Felt Nativity by Bugga Bugs
NATIVITY - PDF Doll Pattern (Joseph, Mary, Jesus, Wise Men, Shepherd, Manger)


Yarn and Felt Folks
You can give these charming dolls as gifts, hang them on your tree, use them to decorate a package, or let them inhabit the holiday village on your mantel.
Yarn Ornaments (I would likely leave off the sparkle.)
Sparkly handmade yarn ornaments
Crayon Monogram for a teacher

Pipe Cleaner Jewelery
Pipe-Cleaner Jewelry
Hand Print Hand Towel

I also just bought my own Wonder Wallet pattern to use for gifts, too!  (My dear neighbor showed me hers...and I need my own pattern now!)  No zippers, but there is a pocket for coins that truly works!
Wonder Wallet
Here are some that I have done before that I may do again.
Personalized Wall Hanging
[IMG_0516.JPG]
Personalized Name Pillow (I've only made one so far.)

And really, I want to finish my Jesse Tree project from last year!  See the felt tree, too.

What easy ideas do you have for me??  I would love to hear them!   Feel free to leave a comment and an appropriate link or create your own Christmas craft post!

Don't forget our four winner giveaway, too!

Wednesday, July 28, 2010

New Home Stitched Card

Stitched are pretty simple to make. Marie at Make and Takes has lots of patterns available and I was inspired to make my own.

I created this little house pattern on my own though. Next time I make a card, I think graph paper would make it a bit simpler instead of just eye-balling it. Our friends had moved into a new home and I wanted to welcome them with a card.
[100_2430.JPG]
To make your own design, you may first want to look at Marie's basic instructions post for stitched cards.  No fancy equipment is needed.  I used a push-pin, cork from a trivet, and embroidery floss with needle.  

I tend to make cards for birthdays these days with my Cricut though, and we still purchase some, too.  Last Christmas I tried to make our Christmas cards, but made less than a third of what I needed.  Lots of people still appreciate a handmade card!  

Thursday, June 17, 2010

Father's Day Hand Prints

If you are a grandpa or the dad to my kids, you should skip this post or spoil your surprise.
This photograph does not show the potential for this "card."  My inspiration came from Izzie, Mac, and Me.  Cindy had made a framed set of prints at Christmas.  It was so adorable, so be sure to check out her set. 

I wanted something more card-like to give to each of the grandfathers and my husband than Cindy's framed prints.  I traced each of the children's hands on to cardstock.  Then I cut those out and traced and cut hand prints from contrasting scrapbook paper.  Each heart holds the child's name.  The oval at the top could be titled with anything, but I decided to put the date and Father's Day there.

It's simple...maybe too simple for some, but you can always make this idea your own!

I'm linking up to Crystal's Craft Spot Challenge.  Click button for more Father's Day ideas!


Wednesday, May 12, 2010

Personalized Notebook


As a little thank you gift for my teacher and E's teacher at the end of our Bible study, I made these little personalized notebooks.  I had made one for myself many months ago...and learned a few lessons along the way.

These are pretty simple to make using scrapbook paper and  Mod Podge on a mini marble notebook.

  • Use sandpaper to rough up the cover of the notebook.  (I didn't on the first  one I made and it did peel a little.)

  • Trace and cut the front and back cover on the scrapbook paper.  Cut a piece from the coordinating paper for the binding.  Fold the binding paper around the notebook so that when it's time to glue it, it will be used to the fold.  Also cut the initial from the coordinating paper.  I used a Cricut, but free-hand would be fun, too.

  • Protect the pages of the notebook from the Mod Podge using plastic wrap all around the three exposed edges.  If you skip this step you are likely to have some pages stuck together.

  • Apply Mod Podge with a sponge brush to the front of the notebook.  Carefully place the paper.  Secure the paper in place with another coat of Mod Podge on top.  When dry, repeat on the back.  
  • When the back is also dry, apply Mod Podge to the binding area and onto the paper.  Carefully place the new binding on the notebook and apply another layer of Mod Podge.  Stand the book on it's edge, as pictured, to dry.

  • When the binding has had the chance to dry, apply another coat of Mod Podge to the binding area and edges.  Also place the letter where you want it by first applying Mod Podge, the letter, and then another coat of Mod Podge.  If you need to move the letter, I would suggest using a toothpick to do so.

Perfect for the purse, but you could do this with a regular sized notebook.  I think it'd be great fun to do this as a back to school project with my daughter when she is (much) older.

My inspiration came from Katie's Nesting Spot.  Check out her post to see how she did this.  

If you haven't figured it out yet, I love all things personalized.  Pillow.  Box.  Barrette holder.  Wall hanging.  Family tree.  

Do you have any suggestions for me for something different that could be personalized?  Do you have any project ideas for me?

Thursday, May 6, 2010

No Sew Tutu


I made this tutu for M.  Isn't it giant?  A friend gave me some of her leftover white and pink tulle to do this.    The tutorial suggested a ribbon for the waistband but I used elastic.  I would suggest the ribbon, too, especially if your child has any sensory issues!  I intend to make another tutu using the ribbon for the waistband instead of elastic.  You can check this tutu video tutorial  for instructions.  (I did sew the elastic waistband, but the rest was completed without any sewing.)

It was a great tutorial for me.  The tutu took me 1-1 1/2 hours to make-while watching television.  Imagine if I had concentrated!  The picture above doesn't really show the colors well, but I used a 2:1 ratio of white to pink tulle.  The tulle crinkled on its own to create a nice "poof"!

M does love the idea of the tutu...she just isn't ready to wear it on a regular basis yet!  She doesn't like the feel of the tulle on her legs because it is itchy.  She put her little feet in a ballerina pose without any prompting or suggestions from me!

When my husband knew what I was making he asked me why.  I explained how much fun M had at our friend's house wearing a tutu.  It may sound like a weird question, but, I have to say that we have never encouraged/emphasized the love of pink, princesses, or ballerinas.  Girly is not bad.  We just don't really emphasize it.  (Hopefully we are finding a good balance for our son, too.)

As I said, I intend to make another tutu for M.  Since I am almost out of the pink tulle, I think I will add color using ribbons hanging down from the waist.  Do you think it would work?

Wednesday, March 24, 2010

Wall Hanging-Personalized

I made this set of three wall hangings for a friend who just had her third daughter.  (Well, in December.  It took me a while, huh?)  My goal was to have three distinct but coordinating hangings. I chose three scrapbook papers that coordinated well enough (hopefully), and used my Cricut to cut the letters in blue and the shadowed letters in a pink/purple.  It was the best I could do without knowing favorite colors or bedroom colors.

I began with wooden ovals (available at Wal Mart, Michaels, Joanne) traced onto the paper.  I painted the edges to match the main color of the paper, and then dry brushed additional acrylic paint in similar shade.

Next I Mod Podged the paper on to the wood.  (Someone recently recommended using a glue stick first, and just Mod Podge the top layer.  Any thoughts on this?)  Then I put a few more layers on top.  After it was dry, I added the lettering.  Toothpicks helped to move them around.


Once I went over the letters a few times with Mod Podge and it dried, I hot glued a ribbon loop to the back (for hanging) and followed that with felt (cut to the oval shape).  The purpose of the felt is to protect the wall.

My friend said her girls loved them.  I know I love all things personalized for children.

I may make one of these for my son's room for his Easter basket.  He officially has nothing on his walls (not even colored paint).  Unfortunately, almost all of my scrapbook paper is pretty feminine, but I will make something work.  I hope.

If you have been reading for a while (or you explore the sidebar's favorite posts), you might recognize this as a variation of the personalized barrette holder.


Sunday, February 14, 2010

Owl Valentine's Day Card

When it comes to Valentine's Day, we are pretty cheap around here!  This year was the first year I ever got flowers for ♥ Day.  I love them, but know not to expect them again for a long time.
Please continue reading the details of how to create this Owl Valentine's Day Card over at This Simple Home.  You can also see my daughter's owl card there, too!

Thursday, December 3, 2009

Manger


I made this manger to go with the Jesse Tree that didn't happen (yet) and the advent calendar with the tiny story books. Each day we read a new little book for the advent calendar and put a piece of hay (yarn) in the manger to prepare for Jesus' birth.
I used mini and regular popsicles to make the rectangular manger. I just used craft glue for the base and sides. Then to make the sides stay in place, I used hot glue.

Monday, November 23, 2009

Multi-Crafting

It seems that I am multitasking my crafts these days. I have several things I am working on at once. I can't say that I like the idea of working on so much at once, but that's just the way it is, I guess. They are all related to Christmas.

  • A mouse hand puppet.
  • A Jesse Tree. I am making my own tree, but using Nicole's ideas at Tired, Need Sleep. If you are unfamiliar, it basically is a way to show the lineage of Jesus Christ in an advent calendar way. I will make a felt tree, but paper ornaments, hung with ribbon. The tree will have buttons to hang the ornaments. The button idea came from a real life friend, and I thought it was very clever.
  • Salt dough ornaments. Classic. Simple. Fun. The two that are painted only by me are finished!

I will post details on all soon. I hope.

Wednesday, October 21, 2009

Stitched Card

I made this card in the spring when our good friends moved to a new house. It was inspired by Marie at Make and Takes. She is yet another great source for inspiration and has many stitched cards designs available and a good tutorial. This little house was my own design though. One thing I learned was that next time I design my own stitched card, graph paper would be very helpful! Recently some people we care about have moved. I'm not sure if I will manage to make another stitched card or if my Cricut will help me. I still wanted to share this though!
These are pretty simple to make. To make the template was pretty simple. I first sketched the house. Then I used a push pin to put holes in the template. I used the cork on the back of a trivet to protect my kitchen table.
Next I placed the template on cut cardstock and pushed all the way through the cardstock. Then I used all six strands of embroidery floss to create the card using the back stitch. Just don't tie knots or you will have bumps where you don't want them! I just used the needle to thread the floss back through some of the stitches on the back side of the card.
You will want an accent color, too. It will give you added assurance that the backside of your card won't show through! Marie recommends spray adhesive. Since I didn't have any, I just used what I had on hand from my scrapbooking supplies.
(And I will apologize now for the crooked picture!)

Thursday, October 8, 2009

Family Tree

This project was inspired in early summer when my older sister gave me a necklace that had a tree on it and it said, "Family is nature's masterpiece." Really, the credit goes to God, but it's a wonderful necklace and 100% my taste. I have a thing for trees.
Shortly after getting the necklace, I had a vision to make a visual family tree. I set to work drawing the tree. This took MANY hours. It's been a long time since I drew anything other than flowers, rainbows, and sunshines for M. (I used to be a bit of an artist. During college I even took a couple classes...enough for an art concentration with my elementary education degree.) At first I was going to keep the leaves uniform by drawing a pattern first. In the end, I decided to draw each leaf freehand. It makes sense since cutting them out is not an exact science for my hands.
I'm pleased with the outcome. The leaves can hold the name of family members. The circle can hold a family surname or initial. Of course it's important to leave blanks for new spouses, adoptions, or births.
If you make one of your own, please let me know! I do ask that you respect the time and effort I put into this and not copy the tree exactly as it is, but just use it as a guide.
Though I think it would be fun to sell (a tweaked version of) this one day, I am really pleased with how it turned out. The first people to get this were the three friends that signed up for the Pay It Forward post. This is the gift I sent them. They, in turn, choose something...anything...to send to three others.
The three blogging friends who got this (not filled out so that they could frame it and give it as a gift if desired) were Debbie (a friend from my church) at Debbie's Digest, Nicole at The Activity Mom, and Lisa at Cheerios Underfoot.
When I was spending an evening cutting (actually many evenings) the trees and leaves, Derek asked me why I didn't just use the Cricut. Wouldn't that be nice? The Cricut just doesn't do customized cutting for me. Wouldn't that be nice though? (I did use the Cricut for the circle and initial though.)
What do you think? Any suggestions for improving the design before I make any more? I'm already thinking to use darker brown for the tree. I used an off-white paper for the background, but a creamier color might be better. I'm not sure if a printed background would be better. What else might help?

Thursday, September 3, 2009

Personalized Barrette Holder

I made this last week, but I am finally getting around to taking/posting pictures. M (not that the photo doesn't say the rest) has been wearing clips in her hair since she was about four months old. Baby clips never worked on her thick, long hair. We've lost a few since we haven't organized them. Hopefully this will work. AND it will be the first item to be hung on her wall. (We're slackers like that. Before we moved she had three items hanging! That was more than a year ago.) I was inspired by Katie's Nesting Spot, but this is my simpler version. Her directions are wonderful!
I bought a cheap unpainted oval at Wal Mart. I painted the edges with a close matching green to the scrapbooking paper I had chosen. On top of the green, I dry brushed white. I used Mod Podge to attach the paper, as well as the lettering that I had used a friend's Cricut to cut. (My next project will be using my very own Cricut! Woo-hoo!!) I chose all capital letters because I don't like the "a" and "g" to be extra loopy for a little girl's bedroom.
I used a hot glue gun for the ribbons. Now I wish they were longer and set further apart. I noticed the clips slide a little on the ribbons. If it becomes a problem, I will place a button at the bottom of each ribbon.
Something I never would have thought of is the backing. Katie suggested using felt to protect your walls. Wonderful idea!
I like this project enough that I will probably do it again, but without the ribbons-just as a decorative piece. You can see more creativeness at Creative Cats Tuesday. (a few days late!)
FYI: We have company coming this weekend and going away for a bit, so I'll be taking a short break from posting. :)

See my newer name plaques by clicking!

This Simple Home (The New Blog)

Follow This Simple Home

Best Blogger Tips

sitemeter 2.16.10